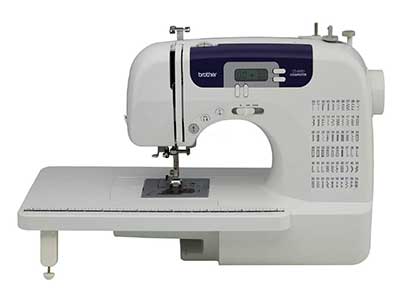
If you love to stitch and looking for a computerized sewing machine that provides you with several built-in sewing features at a superb sewing speed, then Brother CS6000i may be a good option for you.
Brother CS6000i Sewing Machine gained its popularity because of its great looks and excellent features. It is a user-friendly and portable sewing machine.
With the Brother CS6000i, you can rely on it easily for rich and smooth stitching. This detailed review will help you to learn why this machine may be the desired sewing machine for you.
The CS6000i was awarded the Women’s Choice Award in 2020. In a community, 9 out of 10 customers recommending it to others for using this sewing machine because of its excellence. It got an average of 4.5 out of 5 stars from almost 10k customers on Amazon.
Below you will find the top independent Brother CS6000i Review, hand-picked by us to highlight both the good and bad points. It comes with some superb features that we are going to discuss in this review.
Let’s discuss the Brother CS6000i Sewing Machine, its specifications, and features that this model offers.
Product Overview: At a Glance
Review of: Brother CS6000i Sewing Machine
Our Overall Rating: 4.6 out of 5
Why is it Best?
- 60 decorative sewing stitches
- An automatic needle threader
- Seven one-step buttonholes
- LCD screen with computerized stitch selector
- A wide table for larger projects
- LED lighting around the needle
- Higher sewing speed
- Free arm for sewing cuffs and sleeves
- Jam resistant top bobbin
- A hard-protective case
The Brother CS6000i offers a rich sewing experience within its price range. While talking about its overall performance, this machine undoubtedly provides a lot of benefits. With its amazing sewing experience, it can easily dominate over its competence. It has some crazy features like 60 built-in sewing stitches, seven styles of one-step buttonholes, and 9 included presser feet, which makes it impressive. With the unimaginable speed of 850 stitches per minute, this model can easily beat many similar units. The Brother CS6000i is available on Amazon at a reasonable price.
You may also want to check out our Best Sewing Machine Reviews – we have just updated it for 2022.
Features of the Brother CS6000i Sewing Machine
Sewing speed
Every sewer would highly prefer a sewing machine that offers high-speed sewing. When it comes to speed, the Brother CS6000i is undoubtedly an excellent choice for anyone. The Brother CS6000i gives you sewing speed at a maximum of 850 stitches per minute. It’s computerized feature also allows you to control the speed for your better convenience.
You may adjust the speed to slow, medium, or fast by using the adjustable speed control button. To work with thicker fabrics or to encounter any difficulty operation, you can use the foot pedal; this feature is significant. Accurate stitching of slippery fabrics or multiple layers, you can use walking foot.
LCD Screen
The Brother CS6000i comes with an LCD screen with computerized stitch selection. It allows a user to choose among its 60 included stitches and pattern through a smooth push-button touch. It has shift and mode key type of stitch selector. It also easy to view the information that if you have picked the correct stitch or not and informs you which presser foot to use depending on your stitch. The size of the LCD screen is 2.0″ x 0.7″. This LCD screen is conducive for easily getting the instructions.
Automatic Needle Threader
The Brother CS6000i sewing machine includes an automatic needle threader function. It is a lever that helps perfectly push the thread through the needle eye. With this feature, you can be threading your needle very quickly and easily. You can immediately start/stop/reverse operations by one-touch. It has a built-in thread cutter, which helps your works tremendously and pulls threads to the bottom side.
Built-in stitches
Brother CS6000i offers a wide range of sewing and quilting features. It allows you to sew and quilt easily according to your desire. The CS6000i features 60 built-in sewing stitches. It includes quilting, utility, decorative stitches, and seven styles of one-step, auto-size buttonholes. Brother CS6000i can handle a maximum stitch length of 5 mm, and the width is 7 mm. This computerized machine can also automatically adjust the string’s length and width.
Brother CS6000i included nine presser feet in this machine, such as buttonhole, overcasting, monogramming, zipper, zigzag, blindstich, button fitting, walking, and spring action quilting foot. For starting the machine, you must need a minimum voltage is 110v.
Lighting
A sound lighting system may enable you to produce exceptional results. Brother CS6000i offers a sewing light for ceaseless sewing even in low light or in the night. For this lighting system, you can work non-stop if you want. There is a light switch for lighting. This light is particularly helpful when you are working on dark-colored fabrics or free-motion sewing quilts. But still, you can be used extra light for better results when the lighting condition is poor.
Dimensions & weight
Dimension & weight is a fact nowadays since many of us now prefer handy and compact tools. For residential purposes, a compact machine is the best choice. Brother CS6000i is an example of such a machine. This machine has a dimension of 11.4*6.7*16.1 inches. The Brother CS6000i is a very compact and lightweight model that can be taken to sewing classes with ease. The weight of this machine is 13 lbs.
You can operate the CS6000i with or without the foot control. It includes an automatic bobbin winding motor, which is working very fast. In CS6000i, you will get drop-in bobbin, which helps you to one-step bobbin replacement with the quick set.
This machine includes a detachable wide table that is perfect for your larger quilting projects. It also includes a hard case that protects the sewing machine from dust, unnecessary collision, and others. This case makes it a perfect traveling sewing machine.
Free arm
For a smooth sewing experience, The CS6000i also includes a built-in free arm feature. For easy sewing, especially sleeves and cuffs, then Brother CS6000i is an ideal option. It helps to assist with sewing pant legs, sleeves, and other cylindrical items. You can easily sew the hem, kids’ pants, and other similar stuff very quickly and easily. With this machine, you can come up with amazing results even if you are a non-expert in sewing based on its free arm sewing feature.
Embroidery Field
This sewing and embroidery machine is built with a 4″x4″ embroidery field, which is the most popular embroidery design size forever. But, when your projects will be significant, you will face some problems with maintaining. It has included a hoop, embroidery arm, and seven sewing feet include spring action zigzag, buttonhole, overcasting, monogramming, zipper, blind stitch, and button sewing feet. Its alignment feature helps align your designs when re-hooping, which is useful for positioning multiple designs on your project.
Unboxing Gift
When you are unboxing the SE600 sewing machine packet, you will also find a disk-shaped screwdriver, a spool pin, an eyelet punch, a cleaning brush, a power cord, a twin needle, a seam ripper and three bobbins. It has built-in accessory storage where you can put them if you don’t need it.
You will get an English/Spanish operation manual and an instructional DVD in the box. Also, this machine includes a detachable wide table that is perfect for your larger quilting projects. It also includes a hard case that protects the sewing machine from dust, unnecessary collision, and others. This case makes it a perfect traveling sewing machine.
Finally, The Brother CS6000i gives you a 25-year limited warranty, and free customer phone and online technical support for the life of the product.
Looking for a sewing machine how about a sewing and embroidery machine and look no further than brother from automatic needle threading LCD screens and built-in designs Brother sewing and embroidery have the features that let you unleash your designer within you brother at your side are you ready to enter the world of computerized sewing and get ready for the brothers cs6000i the cs6000i includes many of the desirable features that are found in most Brother sewing machines an automatic needle threader an automatic buttonholer [Music] and a quick set drop-in bobbin but with the cs6000i you get even more an LCD screen for stitch selection a start/stop button for easy operation without the foot pedal sewing speed controller that allows you to select your sewing speed making it as fast or slow as you like 60 built-in stitches seven styles of one-step buttonholes a number of twill ting and sewing accessories including seven presser feet and even a protective hard cover the OneTouch start stop and reverse operations allow sewing without the included foot control though quite powerful you’d be surprised how quiet this machine is beginners and seasoned seamstresses alike love the LCD screen see how easy and quick stitch selection is when you use the simple push buttons located beside the LCD screen that’s right no more turning dials and it’s now easier than ever to change your stitches you’ll find that the LCD screen is almost like having a personal sewing guy just take a look if you are using the automatic buttonhole function and you happen to set it up incorrectly an error message quickly reads on the screen and prevents a mistake in your project the screen also tells you exactly which foot to use so there is no need for guesswork wind the bobbin quickly using the bobbin winding system inserting the bobbin is exceptionally easy the bobbin drops in but you don’t have to draw up the lower thread because of the quick-set drop-in bobbin system the brothers cs6000i boasts 60 built-in utility decorative and heirloom stitches each with multiple stitch functions which means you can multiply your creative options [Music] the super wide seven millimeter zig-zag stitch makes a great embellishment stitch for home crafts and garments one of the best features of this machine is the full set of accessories you get which all stow away neatly in the built-in storage compartment the included feet which can help you with almost any project include a buttonhole foot used to create the seven styles of built-in buttonholes an over casting foot which is perfect for creating a flat professional-looking finished edge and prevents raveling a monogramming foot partners well with many of the built-in decorative stitches in the cs6000i a zigzag foot is the standard sewing foot that is used for a most general selling a zipper foot makes zipper insertion fast and easy a blind stitch foot for creating blind hems and garments and home deck items and a button sewing foot there are bonus accessories such as a walking foot for easy accurate stitching of slippery fabrics or multiple layers a quilt guide to create precise evenly spaced quilting lines and a spring action quilting foot for darning free motion quilting or embroidery and finally the included oversized table is perfect for quilting and large sewing projects so if you’re looking for affordable computerized sewing with loads of flexibility check out the brothers cs6000i.
If you are considering purchasing this excellent CS6000i Sewing Machine, we have also included our standard diagram of rating and lists of pros-cons.
Design
Quality
Price
Effectiveness
Pors
- Brother CS6000i is perfect for both newbie and experienced sewers.
- Its threading technology allows for sewing several fabrics very easily.
- CS6000i sewing machine surprisingly powerful.
- You get this machine at a very reasonable price.
- It provides a wide working area.
- For the LED light, your work won't suffer in dark fabrics.
- Stitching speed is incredible, which is a maximum of 850 stitches per minute.
- CS6000i is a portable sewing machine because of its lightweight.
- Its thread cutter works tremendously and pulls threads to the bottom side.
- A hard-protective case included.
- You will get a 25-year limited warranty.
Cons
- Its frame is not very strong for a machine of that size.
- There is no cap on the thread spool.
- This machine may not work well with thinner fabrics.
- There is no USB port.
Frequently Asked Questions About Brother CS6000i Sewing Machine
1. How to thread Brother CS6000i?
Answer: At first, turn off your machine. Then raise the presser foot lever. For the mark on the wheel points up, raise the needle by turning the handwheel counterclockwise. The spool pin completely pulls up and puts a spool of thread on this pin. While holding the thread from the spool with your right hand, pass the thread toward you. After that, feed the upper thread. Make sure you guide the thread through the thread take-up lever from right to left. Put the thread behind the needle.
2. Can the Brother CS6000i sew jeans?
Answer: Yes! You had to use a denim needle and patience. After that, lock the presser foot in place at a higher position. Moreover, you can use the handwheel with some thicker seams as well.
3. How to oil a Brother CS6000i sewing machine?
Answer: At fast, remove the power supply plug from the outlet. Then remove all the needle plate by removing the screws and loosen the faceplate screw. After that put, 2 to 3 drops of oil at each of the points indicated below.
4. How to adjust bobbin tension on Brother CS6000i?
Answer: Bobbin tension is a little annoying for the beginners to adjust the preset tension settings. But the bobbin tension is adjustable and doesn’t take long to master using the manual dial.
5. What size bobbin for Brother CS6000i?
Answer: The Brother CS6000i uses the SA156 bobbins, which are class 15 bobbins.
6. How to wind a bobbin on Brother CS6000i?
Answer: The CS6000i can wind the bobbin by using a winding motor, which is operated with the foot controller or set the speed control to fast.
7. How to monogram with Brother CS6000i?
Answer: No, the Brother SE600 cannot embroider on caps.
8. What size embroidery needles should I buy for this machine?
Answer: Monogramming is not a feature of the CS6000i. But You could use freestyle embroidery – lower feeder feet, use embroidery foot and hoop, then follow a traced monogram pattern.
Final Words
This computerized sewing machine has been one of the most impressive masterpieces we’ve tested. So, if you want a remarkable sewing machine, we highly recommend that you include the Brother CS6000i on your list.
For beginner or expert sewers, there is no better alternative computerized sewing machine available to Brother CS6000i. This machine is designed in such a way that it can provide you with the best results even if you are a novice in sewing. Without some minor disadvantages, this handy sewing machine is perfect for you.
If you have gone through this review carefully, then you can easily decide whether this machine is suitable for you or not. It’s amazing and unique features on top of being a low-cost machine make it more suitable than its competitor.
If you are looking for a user friendly & affordable machine that worth’s your money, then it would be the best choice for you. Happy sewing with this Brother CS6000i sewing machine!
What Are Others Saying?
[Music] hello Liz here and this is IMO’s creative studio in today’s video tutorial I’m going to give you a tour of a simple popular sewing machine so let’s get started this is the brother cs6000i a very popular and recommended sewing machine especially for a beginning quilter so let’s go ahead and take a quick tour of this machine first of all let’s start with it on and off power switch which is down here the machine is currently on because it has a light off and it has a detachable electrical cord so it’s 4 it makes it easier to carry around and put away that’s since I have the machine in this manner there’s a vent to cool off the motor this is a hand wheel flywheel and this wheel does it raises and lower your needle I’m sorry let’s do it this way so you can see your needle this is an elongated base it’s removable so that you can work on sleeves or circular items this is the spool pin where your thread goes into then you have your bobbin winder and the bobbin winder stopper you have your thread guide which helps you thread your put your thread in correctly so that you have the correct tension you have the stitch adjustment buttons which are these and these here you have your take-up or presser foot lever this is the tension dial the needle clamp screw to remove and change your needle this is the presser foot and you could change these feet to suit your sewing needs but this is the needle plate or the throat plate where it has marking signage for measurements could see right here then you have the feed dog and this is located C let’s get this particular fit out and you can see these this mechanism right here has grooves on it so it helps move your fabric through that is the feed dog Bubba bobbin cover release which is right here to release the cover so you could slide your bobbin in bobbin is right here this machine also has depictions or pictures on it sorry so that you can see how to place your bobbin in the holder and then it also has pictures up at the top so you know how to thread your machine this machine comes not only with a foot pedal to make the machine operate it also has an on and off button I prefer using the on and off button because it gives me greater control of what I am sewing this is the reverse stitch button this is the button that uses that you use to put bring your needle up and down this regulates how fast your machine goes and how slow it goes and again these are buttons to adjust the size of your stitching the those are these and then this adjusts your needle so that you can make these various different stitches I do not use the fancy stitches I use a straight stitch either on the side you can move your your needle adjusts right to left in the middle elastic stitching when you use knits when you sew knits zigzag stitching I’ve yet to use any of the decorative stitches and I have not made buttonholes on this machine this machine comes with a set of additional equipment I didn’t bring with bring it with me because I am traveling but I did bring a little box of extra items that I might need for my machine extra needles a screwdriver so that I can adjust loosen and tighten the screws so that I could change my needle that’s right here now as you see I’m gonna turn this on super slow as I increase or move the lever to the right you can hear that the machine has gone faster now I’m very lucky that the still this machine is still in good shape I bought this back in 2014 and I can sew without hanging on to the fabric for this demonstration as you can see I’ve pulled out the fabric and now on the side there is an area where you can cut your threads so if you look really closely you’ll see that it is evenly stitched on both sides here’s the front that just came off the machine and now here’s the back and this machine is set at 0-0 for the needle to be to the left the needle position is on the left and the stitching length is 2.5 now if I increase the number by pressing the plus sign let me see if I can get this closer so you can see it it will increase the number now it’s at 3.0 3.5 4 and it’ll make that stitch wider general sewing for quilting should always be at 2.5 or 3 I have my machine set at 2.5 and you see the smaller stitches what I did is I increased it to 5 and you see how longer each stitch becomes this is the front side that you were looking at as you were stitching and this is the back side and when your tension is proper both the top top and bottom bobbin your stitches should come out even both sides of your fan like this what I’m going to show you now is how to change your stitches I’m going to go from zero zero straight stitch with the needle to the left to a zig-zag stitch which is zero four so I’m going to use the plus sign and raise it one two three four it’s a zero four like zero four and I’m going to increase my stitch it’s it went to one point four so I want my stitch to be a little bit bigger so I’m going to try to make it two point zero two point five the second button regulates how far the zig-zag stitch is from each other let me do a close-up shot of the zig-zag stitch you see how the thread is going left right right left left right right left left right right left pretty neat huh when you are sewing garments they like for you to back stitch and what that means is when you’re making your stitches you stop and you reverse your needle and I’ll show you that in just a moment in quilting we don’t do that because that makes the edges bulkier now there will be some cultures that you’ll see on YouTube that tell you that you need to do that you really don’t because what you’re doing to secure those stitches is when you’re putting your blocks together and you’re sewing them like this are you sewing them like this you are in in other words actually securing those stitches so let me show you what I’m talking about with regards to bags except at the quarter-inch delineation not only here but up here at my Deedle and I’m gonna go ahead and start sewing but wait and doing a garment so I need to back stitch so in this machine I have to hold the button to back stitch see how its back stitching and that secures your thread I just finished back stitching so I want to stitch and continue with my project so I’ll push the button to go and you notice how I’m trying to keep my fabric on the quarter inch not only am i watching here but I’m also watching here No I feel a little bit more confident so I can make money you see how it went out I’ve got to keep your hand on there to make sure that your stitching is straight it’s like driving it will become second nature to you as you become more experienced in sewing now you see it’s at the end of the fabric now I want a backstitch so I’m gonna go ahead and push this button and the feed dog dog feed is going to bring that I are gonna bring that fabric forward you see how a double stitch go ahead and turn on your machine so that you can finish it for and I don’t know how many times I’ll mention this because I am a victim of this to times not once but two I have gotten my fingers caught in this needle index fingers my left hand first time there was somebody in the room with me that they were able to stop the machine and pull the needle up using the hand wheel and I got my finger out the last time was about a year and a half ago and I wasn’t paying attention and this was on my new machine that’s a professional machine that can get the stitches to go 1,500 stitches a minute I was on high-speed wasn’t paying attention and sure enough the finger went in I got shocked scared yanked my finger out and I ripped the skin and made a big mess so please please please please be careful when you’re sewing you want to keep your fingers away from this area because it will be a horrible accident then you don’t want that to happen you and rip the thread and find the end pull it out I’m gonna place it into the spool pin and then I’m gonna bring it across in front of this silver button right here I don’t know if you can see it right here and then I’m going to pull it grab my bobbin and if you can see there’s a little hole where I’m going to stick the thread into let’s see if I can do this in one fell swoop all right here we are we’ve got a back in here again I’m holding a little piece of string thread you can see the bobbin slowed up sighs turn it off the bobbin will wind more thread because the thread is thinner all right so the thread went in back here that was number one number two goes in through here whines around inside underneath number three up it gets thread into the silver thing it’s got a hole in it number four out again down number five you thread it in here now this machine has a self threading mechanism sometimes I get it sometimes I don’t the needle the hole of the needle is down here and I’m gonna try doing it with the mechanism if not that I’ll have to thread it by hand now I’m going to place my bobbin and it’s very important that the bobbin is placed correctly the bobbin will be dropped right into it into the bobbin holder with the thread to your right let me show you how it should look up close you see how the bobbin thread is pulled up and I should be able to pull my bobbin thread out and you see I’ve got the two threads out this way I usually like to have my thread going to the right even though I’m left-handed I do a lot of things to the right and I believe the proper way for sewing is to have your thread on the right and now you’re ready to start quilting thanks for watching this short quick video tutorial on the brother cs6000i sewing and embroidery machine if there is a question comment or something that you would like me to video as a tutorial please comment below like and subscribe liz here for IMO’s creative studio until the next time happy quilting [Music] you [Music].
Hello in this video I’m going to show you how to sell out brothers cs6000i sewing machine so that you can avoid that frustration of reading through the menu because it took me forever to figure this out so I hope this video will be helpful for you in order to get this sewing machine running and turn off the threading part we’re going to need to sell out two parts the first part is the bottom Bobby we need to sell out a bobby thread and then the second part is the top portion so let’s go ahead and start with the first part which is thready Bobby you will need an empty bobby like this one and then the thread we are going to follow the printed instruction on the machine the one with the black background first put the thread right here then take one thread and loop it around the circle you are kind of looping and making like a little X when you bring it over I will redo it and show you the close-up view of this step once you have the thread over go ahead and leave it there now we are going to take the empty Bobby we are putting your Bobby down make sure that the square section matches the metal part of this this part right here you hear click sound once you know that it’s set in there properly now go ahead and push this toward the right side with the loose thread that we have go ahead and bring it over and make several groups around the empty Bobby you want to make several groups so that yakyu stays there if you only make one or two loops it’s not going to be us stable so that it might just be circling not really bringing the thread then you can use the little built-in cutter and cut the thread off here’s the little culture that I was talking about go ahead and turn on the machine I have my machine CLR using a pedal so I’ll be using a pillow to do the threading and this is the Koopa I really like this I think it’s really fun to watch you will know that it’s kind of full if it’s starting to get slow so go ahead and just remove it before in reach that point or just get as much thread as you need once you are done with this part take out the bobby make sure you push to the left first before you take it out this is what it should look like once it’s done just for safety purpose I prefer to turn the Machine off when I’m doing the other part just in case I accidentally pressed something good so I highly recommend that you turn it off before you continue this part now we are going to use the bobby and pull it inside a lower compartment push this thing right here to the right side and it will pop up the lid remove the lid and then go ahead and put the threading according to the little label right there and the key part with this one is make sure that the thread follows that the arrows right there once they reach the endpoint go ahead and cut it off using the little cutter right there once it’s all set make sure you put a lid back on all right now we are ready for the top session with the top session this time we are going to follow the instruction the print on the instruction without a black background so we are going to bring this over through the step 1 that little mellow session and go down to step 2 3 4 5 this is the overview of the step so let’s go ahead and do this step by step the first step is to loop it around the mellow session this time we are putting it in a slightly different location compared to the first time we are going to bring it under the little hook right here bring once I have the thread over and then kind of bring it from the top and move it over and bring it toward you when you’re doing this probably want to make sure that it kind of hooks around that little angle every yard of this mellow session so you want to bring it under and then bring it over to where what number 2 is now I’m doing the same step from a different angle so you can have a better look and take the threat follow number two and bring it over to number three when you are bringing the threat over for number two to number three it will automatically get onto that little hook right here this way it stays there now bring it over to number four number four has a little built in the metal kind of like a separator or maybe like a little halter to make sure those threats stays there so first time we all bring it over from three to four make sure the thread stays on the right side leaning against number three and once you have it all the way up bring it to a number four so that it kind of hooks around the metal area now you bring it down to number five after you thread pass this number five what you want to do now is bring the wire behind this needle there should be a little hook that you need to bring the needle over behind it like so once you do that take the thread and bring it over to the left side and while holding the thread bring down this one right here there’s a little like a triangle shape like hook like kind of like upside down V and you want to bring your thread underneath it so that it stays in there now push this one down gently and to it reach to the point where the needle hole is when you bring it all the way down you will notice that the two hooks will embrace that needle hole area now this part it’s where you want to be very careful when you push all the way down bring your thread over and kind of like pointing it down make sure that when they get to the hook area that it’s staying on the bottom part once it gets inside those hooks safely now you want to bring it up the reason you do that because there’s tiny needle there so you want to bring it in to make sure that a list inside the hooks and then when you bring it up you make sure that it’s in a really good position for that ending needle to pull it over to go through that little hole I’m going to do this one more time so you can’t take a really good look at it so first bring the threat behind a little hook and now bring down that the little device and hook over up the upside-down V bring it over hold it in slightly tight bring down the device even further and now bring the thread underneath the two hooks and then bring it up once you are fully secure so that little that little needle get the hand of the thread and now slowly revisit you want to also go a little bit lighter on the thread and then just bring the rest of the thread over once you bring over the rest of thread go ahead and take it and go under that little hook right here so that goes underneath it now you are all set okay now we are ready to do the testing take out a piece of fabric pull it underneath this area bring down the presser foot lever turn your machine on and you are ready to go once your I’ve done and the needle is now up you can press the needle lifter which will bring up the needle and then undo the presser foot lever you can now pull out your fabric on this side there’s a little cutter you can use to cut off your thread you can either go from the front I’ll go from the back this is what the testing products like I hope this video has been helpful thank you so much for watching have fun bye you.