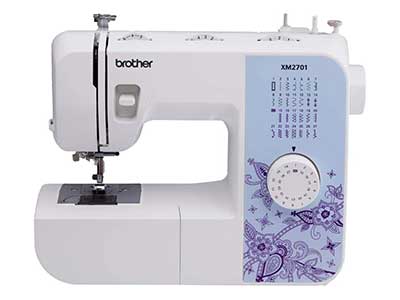
Are you looking for a sewing machine that is very lightweight with amazing features? Then Brother sewing machine XM2701 is an excellent choice for you. Brother XM2701 is lightweight, fully-featured, easy to use a sewing machine. This sewing machine is specially made for either the beginner or the experienced sewer.
In Brother XM2701 review, we discuss some of the amazing features of this machine and give you awesome buying guides.
Brother is a wonderful brand in the sewing machine industry. They bring the same level of dedication to quality to their machines.
The XM2701 is one of Brother’s genuine as lightweight as an excellent sewing machine.
This Brother sewing machine XM2701 is wonderful for everyday sewing projects. It is appreciated for its user-friendly features and lightweight design.
In a community, 9 out of 10 customers recommending it to others for using this sewing machine because of its excellence. The Brother XM2701 was awarded the Women’s Choice Award in 2020. It got an average of 4.7 out of 5 stars from more than three thousand customers on Amazon.
Below you will find the top independent Brother XM2701 Review, hand-picked by us to highlight both the good and bad points.
Product Overview: At a Glance
Review of: Brother XM2701 Lightweight Sewing Machine
Our Overall Rating: 4.6 out of 5
Why is it Better?
- 27 decorative sewing stitches
- An automatic needle threader takes care of the needle
- Jam resistant top bobbin is easy to insert in your machine
- LED lighting around the needle
- Free arm for sewing cuffs and
The Brother sewing machine XM2701 model is picture-perfect for either beginner who is learning to sew or advanced sewers who are looking for versatility. Brother XM2701 is lightweight, qualified, and capable of delivering decades of trouble-free service. Therefore, XM2701 is an excellent choice for a reliable and ruined-free sewing machine. It retails at a reasonable price on websites like Amazon, Walmart, and others.
You may also want to check out our Best Lightweight Sewing Machine Reviews – we have just updated it for 2022.
Features of the Brother Sewing Machine XM2701
Built-in Sewing Stitches
The Brother XM2701 sewing machine has 27 built-in stitches including decorative, quilting, blind hem, zigzag and basic stitches. It has an automatic one-step button holder for virtually perfect buttonholes.
The sewing machine has six quick-change sewing feet such as a buttonhole foot, button sewing foot, narrow hemmer foot, zipper foot, blindstich foot, and zigzag foot.
You can see all stitches in front of the machine. The stitch type icons with the number are located just on top of the stitch selector rotary dial. In selector dial, the only number has in order. You have to turn round this dial for selecting a stitch with the respective number.
It is easy to use to gain your sewing experience. Brother XM2701 can handle a maximum stitch length of 4 mm, and the width is 5 mm.
Automatic Needle Threader
The XM2701 sewing machine includes an automatic needle threader function. It is a lever that helps perfectly push the thread through the needle eye. With this feature, you can be threading your needle very quickly and easily.
This feature is beneficial for those people who face the problem of getting the thread through the needle eye. When your designs require multiple threads, then you can change it with the touch of a lever.
The Brother XM2701 has twin needle features. Its twin needles help you to create parallel and decorative stitches on a whole host of fabrics.
Free arm
For a smooth sewing experience, The XM2701 also includes a built-in free arm feature. For easy sewing, especially sleeves and cuffs, then Brother XM2701 is an ideal option. It helps to assist with sewing pant legs, sleeves, and other cylindrical items.
You can easily sew the hem, kids’ pants, and other similar stuff very quickly and easily. With this machine, you can come up with amazing results even if you are a non-expert in sewing based on its free arm sewing feature.
Jam resistant drop-in bobbin
The XM2701 sewing machine comes with the exclusive jam-resistant quick-set top drop-in bobbin. This type of bobbin is easy and convenient to insert than side-loaded bobbins in the sewing machine. There is no need to ‘fishing’ for the bobbin thread. Nowadays, everyone wants to problem-free things. So, this feature makes your projects smooth. It includes an automatic bobbin winding motor, which is working very fast.
Speed
When it comes to speed, the Brother XM2701 is the right choice for anyone. The Brother XM2701 gives you sewing speed at a maximum of 800 stitches per minute. It is not as fast as an industrial machine.
Size
The weight of the XM2701 sewing machine is only 12.6 lbs. The proportion of the sewing machine in height 12.1 inches, in weight it is 15.3 inches, and its depth is 5.9 inches. In dimension, it looks perfect. For these, you can bring it easily wherever you want to stitch. For starting the machine, you must need a minimum voltage is 110v.
Super Bright LED Light
The XM2701 has a LED light around the needle, which illuminates the working area. With this, all time of the day, you can see your project as bright. This light is particularly helpful when you are working on darker fabrics.
Unboxing Gift
When you are unboxing the XM2701 sewing machine packet, you will also find some accessories of the Brother sewing machine XM2701 such as a needle pack, a screwdriver, an extra spool pin, a darning plate, a power cord, a twin needle, and three bobbins. It has an accessory bag where you can put it if you don’t need it.
You will get an English/Spanish operation manual and an instructional DVD in the box. You can set up everything and start sewing in a short time.
Finally, The Brother CS6000i gives you a 25-year limited warranty, and free customer phone and online technical support for the life of the product.
[Music] start sewing right away with the easy-to-use brother XM 2701 it’s perfect for beginners or for more advanced sowers looking for a great portable machine the 27 built-in stitches include stitches for everyday sewing blind hems quilting and decorative stitches selecting your stitch is as easy as turning a dial and the one-step buttonhole is automatically sized to fit your buttons you also get six quick change sewing feet a tremendous value it’s incredibly easy to change between feet with just a touch of a lever your needle is threaded for you with the quick-set top drop-in bobbin there’s no need to pull the thread up before use and it’s easy to see when you’re low on thread the LEDs give you a super bright work area to see details plus you’ll love how easy the instructions are to follow enjoy all the great built-in features including accessories and Brother support with the reliable easy to learn and use x’m 2701 from Brother
If you are considering purchasing this lightweight XM2701 Sewing Machine, we have also included our standard diagram of rating and lists of pros-cons.
Design
Quality
Price
Effectiveness
Pros
- Brother XM2701 is lightweight, which is suitable for portable.
- The XM2701 is so easy to use for beginners.
- You get this machine at a very affordable price.
- Automatic needle threading system.
- One-step auto-size buttonhole.
- For the LED light, your work won't suffer, isn't enough light in the room.
- Stitching quality is incredible. As a sewer, you would be satisfied.
- You will get a 25-year limited warranty on chassis casting.
Cons
- Cannot handle heavy-duty fabrics like leather.
- Due to lousy thread tension, it's needle may have been breaking easily.
- It doesn't stitch as fast as an industrial machine.
- Case or cover not included.
Frequently Asked Questions About Brother Sewing Machine XM2701
1. Is Brother XM2701 easy to use for beginners?
Answer: Yes, it is easy to use for beginners who are learning to stitch. But it is also useful to advanced sewers who are looking for versatility.
2. Can leather be stitched with a Brother XM2701?
Answer: Unfortunately, it can’t.
3. Does it have easy access to cuffs?
Answer: Yes, The bobbin cover detached for easy cuff access.
4. What size needles should I buy for this machine?
Answer: The XM2701 comes with the 90/14 needles. The XM2701 can use any brand of needles from 75/11 to 100/16.
Final Words
The Brother sewing machine XM2701 offers you amazing features compared to similar models at the same price. It is a fantastic choice for beginners; also, experts can choose it for its amazing features.
It has many great stitch styles for new users that will be able to complete many projects. All stitch is easily selectable by rotary dialing. A free arm that is great for cuffs, and pants as well as some suitable features such as the LED light, auto-threader, auto-size buttonholer, and jam-free drop-in bobbin.
All these features make your life much more comfortable and contribute to the pleasant experience of getting to learn the qualities of this excellent sewing machine. Best wishes for your sewing journey!
What Are Others Saying?
Welcome back to independent verification. My name is Andrew Esquivel. Today we’re going to be reviewing the Brother XM2701 sewing machine. This review is for those of you who have little to no experience using a sewing machine, and thus you don’t really want to spend a whole lot of money on what would ultimately be your first ever sewing machine. I’m reviewing it in that perspective because that’s the situation I’ve found myself in, which is why I got it. Let’s be clear, there are plenty of machines out there that are of way higher quality than this one, have a ton more features than this one and are subsequently way more expensive than this one. That’s not why people like me get this. I got it because it’s cheap and it does the basic work that we need it to do. There’s nothing fancy about it, and that’s okay because that’s what it’s meant to do. That’s what it’s here for, to just do basic work on fixing parts of your clothes that maybe need to be hemmed or maybe there’s a tear that needs to be sewn shut. Nothing fancy. That’s exactly what this does and it does it pretty well. It’s been about 15 years or so, give or take, since I’ve barely touched a sewing machine. During that time, I’ve completely forgotten how they function, how to set one up, or really even use one properly. That’s how I feel comfortable saying I’m really coming at this in the perspective of a total newbie. You know what? I’m happy to report that it’s not hard to figure out. Most everything is labeled in which order things go where when you’re routing the thread through things and getting it set up. It’s pretty self-explanatory actually. Brother provides instructional videos which is something I didn’t have 15 years ago. Figuring it out really is something that pretty much anyone can do. One thing to remember is that this is not a tutorial. There are plenty of other people on YouTube who have made fantastic videos on how these things work, the insights, and how to manipulate the machine to get the best results out of whatever stitch you’re trying to do. The reason why I’m showing you the machine at all in this angle in this case is because I really do want to emphasize how stupidly simple this thing is to figure out. Everything is labeled that tells you exactly how to do it in what order and how things go where they need to go. When you’re trying to wind everything up, set the thread to go to the arm that goes up and down, and then goes into the needle and everything. It’s very clear how everything goes and how to spool up a bobbin, which is another little thing that goes down in here and how to set that up. It’s all there. As long as you can interpret the instructions, which again, someone who’s not used a machine in over 15 years. Again, I didn’t use this machine, they’ve apparently changed a little bit since I had worked on stuff involving them back when I was younger. It’s easy to figure out. Instead of just repeating all the things that any other YouTuber with way more experience with sewing machines could say about this particular one, let me just show you something that I’ve done with the machine in the real world. Actual examples which involves my work pants. Get a load of me. These are some very basic stitches that have been done. Obviously, I am very far from the work of a professional seamstress. Well, you know what, as a utilitarian stitch to hem these things up, it did a pretty good job. The reason I’m showing you this case in particular is because it’s not just some thin fabric that everything had to go through to make these particular stitches happen. This is fire hose canvas and I folded it twice. That makes a total of four layers of tough heavy canvas that the machine had to go through perfectly every time it needed to make a stitch. Some cheaper machines out there have problems going through big amounts of layers like that. To throw an even tougher situation at it where you have thick heavy canvas, well, all I can say is I’m pleasantly surprised that it was able to do what it was able to do. I was able to hem up my pants a few inches because they were definitely too long and it was easy. It was really easy. In fact, there’s actually one thing that I want to talk about on this thing that really makes it easy. Now, I just want to take a quick moment to appreciate this nifty little mechanism that they’ve included that helps you put the thread through the eye of the needle. This thing comes down and then you turn it and it locks into place and right here is a little hook that goes through the eye of the needle and you just basically wrap the thread around that hook and it pulls it up and through. Oh man, that is an incredible invention in my eyes. I remember when I was younger having to thread the eye of the needle by hand, it was always such a pain in the butt. Now, of course, what review would this be if I don’t actually show you the machine working? I got a random piece of, well, fabric. This is canvas, not super thick canvas, but canvas nevertheless. We’re just going to quickly sew through it, just a quick utilitarian straight stitch. Put it in there, drop the foot. Of course, turn it on and when you do, a nice little white LED will light up the work area that you’re using. Let’s get one stitch going by hand by turning this little crank. Then we use the foot pedal. If you’re used to driving a car, this really shouldn’t be all that much different, and we just gently feed the fabric through. We’re not pulling it because it just moves a little bit for you. We’ll go down and go back a little, forward a little, and we’ll just pull it and break the thread right there. Scoot to the side and let’s take a look at what I have just done. Zoom in real nice and close for you guys. This is the stitch that I just made. Now, it would have been better if I’d taken my time and I wasn’t just all over the place. That’s honestly, that’s user error. [chuckles] Still just a quick little thing. Let me get the camera to focus here. Quick little straight stitch. Again, as long as you get some practice in, you’ll get those those stitches a bit straighter. If I try to pull on the stitches here, yes, I can’t get it to separate, so it’s a good strong stitch. Now, obviously, there are plenty more stitch patterns and tips that you can do with this machine than just a simple straight stitch. I’m not going to go over all of them because there’s 27 different things to select here. It’s not just the stitches that have things you can select. There’s components that it comes with to help you with every sort of various scenario and some of those things are feet’s. Now, these feet serve different purposes for different types of stitch work. That’s a bunch of these. I’ll be honest, I haven’t tried any of these because I haven’t needed to. Honestly, this goes beyond the scope of what I got this machine for anyway. I imagine there’s a bunch of you who if they get this– I imagine there’s a bunch of you if they do get this will probably learn a lot more than I have, use it a lot more than I do, and get more satisfaction out of it because the fact that matters is, at the end of the day the machine costs around $100. I believe I got it on Amazon for about $87 before tax. When you think about it, all the pants and clothes that I have been able to mend together instead of throwing out, well, this machine has already paid for itself. The work pants that I’m wearing right now sell for about $70 alone. Instead of having to buy a new pair of pants when something rips or tears, saving myself what might be a $70 expense to replace those pants by just doing some simple stitch work on this machine. Is the machine perfect? Probably not perfect. There are some things I’m sure that could probably be improved upon, but in my experience as someone who really hasn’t worked with these machines a whole lot, I’m really quite happy with it. That’s basically where the story ends. I’m someone who doesn’t know anything about this stuff. Just got it because I figured it would save me money, and it did. You know what? I’m satisfied. It does the basic things I need it to and for a basic machine, i wouldn’t ask for much more than that.
[Music] so now that we have our zipper all pressed we need to go to our fabric and for this demonstration I’m just going to mark the wrong side of the fabric so it’s a little clearer to see what we’re doing so X is wrong side of our fabric so what you want to do is you want to turn your fabric to the right side and you want to take your zipper and also lay it right side up so that means that your zipper pull is gonna be faced towards you and then you can kind of flatten your zipper out straight and now if you think about it your zipper needs to go right sides together so we’ll flip this onto the piece and then if you’re ever curious to know if you’re doing this right you can always take a couple of pins and pin your zipper to double check and make sure you’re sewing your zipper on the right way so if we if we do this after we sew a line when we zip the zipper up the teeth are gonna pull this way and it’s gonna pull all the fabric in like that so we know we’re doing the right thing so we will I’m just gonna unpin this in one spot we’ll move that aside because we’ll do one side at a time okay so here we have our zipper and that’s where it’s going to go but we want to line it up kind of nicely so I’m just going to line up the top of the tape with the top of the fabric and I’m going to line up the edge of the zipper tape with our raw edge of the fabric and I’m going to pin it down nice and evenly and straight and then I can just pin it down as far as you can go that’s super pull it’s always in our way okay now we can take this to the sewing machine so what we want to do when we sew this is to sew as close to the teeth as possible so you’re going to use a zipper but we have our zipper foot here and my zipper teeth are on the left so I want to go ahead and put my zipper foot on the right and then I’m gonna take my threads put them underneath and towards the back and now I’m ready to stitch so I’m going to take the whole project and put it in I’m going to lower my zipper foot now the very edge of the zipper foot is touching the zipper teeth I want to get it as close as possible so really squish it up there and then I’m going to take this pin out and we’re just gonna sew straight down back stitch at the top and then use your hands to keep the zipper right up against that presser foot and you can see what’s happening here the zipper teeth are kind of curling back because they’re pressing up against the zipper foot and that’s okay take your pins out as you go and then you just want to sew down as far as you can get closest to the zipper pull so that’s about as close as I can get because now the polls in the way of my presser foot so I’m going to reverse stitch back stitch and now I’m done okay so now we have half the zipper installed so looking at it from the right side you see the zipper pull is facing you and then from the wrong side we have the zipper sewn onto the edge so here’s the tricky part we want to take right side up on the left and now we’ll take our pink fabric on the right rights our wrong side down right side up and we want to lay this zipper right side up so we’re got to kind of twist a little bit and so we see the zipper pull is facing us and now we always want to sew right sides together so what are we gonna do we’re gonna twist this again and we’re gonna lay it flat against the second piece and just pin it in place once it’s pinned down it’s good you know that’s how it’s gonna lay so now you can kind of move this around to get a better position to pin the whole thing down so get your pins out and we’re gonna line up the top of the tape with the top of our fabric matching our raw edge with the side of the zipper tape and then just pin it down as far as you can go that’s good so now let’s take this to the sewing machine and if you’ll notice my zipper is now on the right hand side but our zipper foot is also on the right hand side we need the zipper foot to move to the left so I’m just going to unattached it and reattach it with the presser foot on the Left make sure those threads are behind so now our zipper is on the right I’m going to line that up we’ll do a back stitch and then I’ll go ahead and start sewing so remember we’re keeping the edge of the zipper foot pressed right up against those teeth and then I’m going to go until my presser foot hits this zipper pull and then I’m going to back-stitch ok so now we have our zipper in and if you turn your fabric right side up so everything’s right side up you see this is wrong side with our X’s we do right side up and we pull our zipper and you can see our hidden invisible zipper but we’re not quite finished yet because we need to finish the seam at the bottom so the last step is to take your project to the Machine and you want a stitch from where we left off at the zipper down to finish your seam so this part can be a little tricky it just takes a little bit of practice you’ll keep your zipper foot in your machine and now again my zipper is on the left so we’ll need to move the foot again to the right okay so make sure you’re starting where you left off so we’re starting right at this back stitch at the bottom of our zipper we have our the raw edges of our fabric together and we have our zipper foot in so we’re trying to get as close to that stitch as we can so we’re going to do a back stitch and then we’re gonna go all the way down the seam and sometimes it’s happening right now because this is really bulky it’s getting caught underneath the foot so you might have to just kind of lift things little and flatten some stuff out and then now we have our completed invisible zipper [Music].